CATEGORIES

Monday, 30 December 2013

Delfts Blue Amigurumi (madam Blå)

Another "rumi" based on the pattern for the basic amigurumi pattern link. I prepared for this amigurumi a long time ago when I bought the blue colour-run/tie-dye blue cotton yarn. I also had another swatch of thin sewing yarn that also had a blue colour-run, bought even longer ago, perhaps almost 20 years ago. Anyways always thought they were the perfect match but what to make? So suddenly as I was preparing for the exhibition and workshop I thought, hey I will make a rabbit. and I was somewhat inspired because I had seen this Dutch porcelain clog with Delfts Blue pattern on it.
Delfts Blue Amigurumi Rabbit, the Delfts Blue flower pattern turned into a flower shawl, still wondering if I should embroider them onto the shirt...

the initial yarn selection and colour-card I made for the rabbit. again; I don't recommend to use those eyes, it didn't work well in the end.


As I was doing the works and also in parallel preparing for the exhibition; meaning cleaning up my image archive to create some posters, I suddenly came across the picture with which this had all started. it's a rather old baby-picture, an image a colleague send, and I remember I thought back then ah, I will crochet a Delfts Blue Singaporean Merlion ( this colleague lives is a Dutch living in Singapore) but as things went I never got to make the Merlion, and had also completely forgotten about the idea, until I encountered the image again.
Mik, 2007


Saturday, 21 December 2013

Pyke glitch

what happend? Truth is I don't really know, but last night I was working a bit on Pyke's amigurumi, putting him into a Judith green background. The kind of green that his mum uses on all her pictures. and as I was photoshopping, I wasrecoloring the background using an old trick of simply deleting all surrounding colour. and I was a bit irritated that it took soooooooo looooooong. and then vupti, there was a very strange, but also very nice Pyke on a patchwork background of himself. Love it.

Friday, 20 December 2013

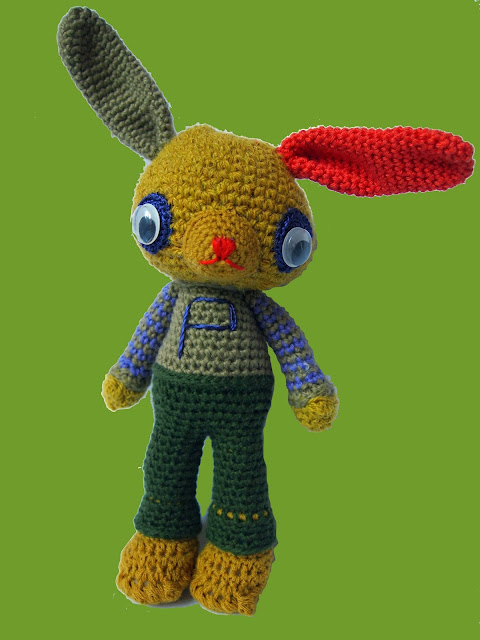
Pyke's amigurumi rabbit

Christmas holiday has begun, which means I have some time to finally update the blog with a little story about Pyke's rabbit. I made it over the summer following the basic amigurumi pattern.

Pyke is the son of our friends, in this case what inspired me was the particular taste of colour of his mum and the embroidered name-card that his parents send to us when he was born.

#crochet #amigurumi


by choosing the colours of the yarn, I choose and set the general mood of Pyke
Pykes head - work-in-progress - I really regretted putting on the plastic eyes, and later I crochetted new ones as usual. Those plastic ones don't look that good and are dangerous for babies, they may choke on them.
the name-card send when Pyke was born.
here's Pyke with Pyke (and his dad) he really likes to chew on the ears.

Friday, 13 December 2013

Street inspiration from Hong Kong

I was lucky to be able to visit Hong Kong in the beginning of December. Here are some inspiring street shots that I made along the way.
christmas Knitting graffiti in Patterson Street, Causeway Bay, Hong Kong


Swatch shop front
Exhibition by local HK artist Prudence Mak in the mall in front of the office.


Japanese knitting books galore at Tomato Books. There was even Arne & Carlos translated to Japanese.
 Thx Jur for the tip. But I couldn't choose. #hk
Chinese knitting magazine galore at Shenzhen Central station.
Again surprised by how many Scandinavian and English original titles there were

Sunday, 17 November 2013

crochet a basic Amigurumi rabbit, hækle en basis Amigurumi kanin

(Dansk oversættelse nedenunder)
Finally it's here the basic Amigurumi crochet pattern. I'm sorry it took so long for me to get the pattern written-up and put online, but my day-job has been very demanding ever since the workshop and exhibition. And besides from that also had a bad back and a cold to fight. But now I'm feeling good again and have the energy and time to get this shared.
Both during the workshop and in the aftermath, mistakes were found in the first pattern, I have corrected those in this version. The worst mistake was that the arm was missing. I'm terribly sorry about that. Besides from that mistakes were small, such as not giving the right row for the placement of eyes and mouth.
As you have probably already noticed the pattern is drawn in the Japanese way. In principle it's super-logic, if you read the legend first and then follow the signs it speaks for itself. You start with the head, the top of the head, and basically crochet in circles, increasing and decreasing to make the shape. The head, body and legs are all made out of one piece. The eyes, ears and nose are made as loose decorative pieces that you stitch on. The underside of the foots are like lids that you stitch on to close off, and the arms are crochetted seperately and stitched on. Amigutumi is crochetted tightly and you need to stuff the amigurumi as you go, particularly the head needs to be well stuffed.
wrt further colouring, patterning and styling, the only limit is your imagination. You can make stripes, dots, little characters exactly as you please. I usually use left-over yarns, as I find it interesting how the limited choice of materials can lead to new creative ideas.

I have a little advise, amigurumi needs to be crochetted tight, but don't let that lead to tight and tense shoulders. You should take regular breaks and move shoulders, arms and hands to get the blood circulated. F.x. you can stand up and gently swing your arms back and forwards that's a very good exercise.

I wish you all good luck with crocheting, if you have questions, have remarks or find more mistakes you are most welcome to shoot an email to hannepanne@theknitbitch.com. I cannot primise that I will always answer straight away, as my day-job is quite demanding and will keep me very occupied until end of this year.

I'm pondering on a christmas-doll (nisse in Danish) but unfortunately not sure if I will manage this year. But keep watching this space.


Så er den der endelig, Amigurumi hækle kaninen. I må meget undeskylde at det har taget så længe inden jeg har fået lavet opskriften færdig og sat den online. Men som god undskyldning må jeg sige at mit day-job lige har været lidt krævende siden udstillingen, og så har jeg lige været nede og ligge med ondt i ryggen og forkølse. Men nu er jeg ovenpå igen, og her er så opskriften.
Både i løbet af workshoppen og også bagefter har der været en del fejlmeldninger, så dem har jeg alle sammen rettet. En af de mere dramatiske fejl var at jeg havde glemt at give opskriften til armen. Det må I altså meget undskylde allesammen. Ellers var fejlene små, det drejede sig fx om i hvilken række man skulle placere øjnene.
Som du nok allerede har set er mønstret tegnet på rigtig Japansk vis. I princippet er det super-logisk eller som at bruge Margit's ord "logik for perlehøns". Du begynder i toppen af hovedet, og hækler så simpelthen cirkler og tager ud og ind, sådan opstår formen. Hovedet, kroppen og benene er hæklet ud i et stykke. Al dekoration; snude, øjne og ører, er hæklet som løse dele og broderes på. Ligeså med armene. Og bunden af fødderne er ligesom nogen låg, man bruger til at lukke med. Amigurumi skal hækles stramt og fyldes mens man hækler, så altså fyld hovedet når du er kommet til halsen osv.
mht videre modellering, farvebrug og typologi, er det kun din fantasi der er begrænsningen :-) du kan gøre ligesom du vil, bruge de farver du gerne vil, lave striber, prikker ligesom det passer dig. Jeg bruger altid garn-rester, så tvinger begrænsningen af materiale en til at være kreativ og lave noget skørt.

Jeg har også lige et godt råd; amigurumi skal hækles meget stramt, men husk at tænke på ikke at spænde skuldrene for meget, og tag godt med pauser hvor du bevæger både arme, skuldre og hænderne for at faa godt gang i blod-cirkulationen. fx kan man stå op og let svinge med armene det har en god effekt.

Jeg ønsker jer allesammen held og lykke med hæklningen, hvis I har spørgsmaal, bemærkninger eller finder flere fejl, er I mere end velkomne til at maile til hannepanne@theknitbitch.com. Jeg kan ikke love at jeg altid svarer sådan lige vupti, for som sagt er mit day-job krævende, indtil årets slutning har jeg meget travlt.

jeg pønser lidt på en jule-nisse, men tror desværre ikke jeg når det i år. Men keep watching this space.




Monday, 21 October 2013

Amigurumi udstilling og hækleworkshop på Sønderborg Slot

(English below)

Der var gang i den i weekenden på Sønderborg Slot, hvor den årlige Husflids udstilling fandt sted. The Knitbitch havde en lille Amigurumi udstilling i Drabantsalen sammen med Irene Birk fra PaaPinden. Vi var ligesom en lille udbryder gruppe, henvist til et lidt afliggende rum, med til gengæld masser af plads. Vi viste et nyt perspektiv på husflid, demonstrerede at selvom håndværk anses som traditionsbundet kan det moderniseres hvis man bare har fantasi. Og det kan være en mindst ligeså tilfredstillende hobby for "unge". Ja, nu er det jo ikke fordi vi er rigtig unge, nok nærmere midalderende men sammen foryngede vi helt sikkert showet. Både Jydske Vestkysten og DR nyhederne (17m30s) kom forbi og lavede indslag, så der var også fin medie-dækning. Edith Hansen, forkvinden for Sønderborg husflid spottede en trend at der i de sidste år har været flere unge mennesker der deltager. Mens Irene Birk ganske rigtig fortalte om hvordan håndværk / husflid kan kompensere noget af alt det computer arbejde som jo næsten er uundgåeligt hvis man vil deltage i arbejdsmarkedet. Jeg har også et ret krævende job med masser af computer arbejde, og for mig er der ingen bedre måde at falde til ro på om aftenen. Jeg anser strikning of hækling som meditation, og der er jo allerede en del research der har vist at det passer.

There was a lot to do this weekend in Sønderborg Slot, where the yearly exhibition by the local arts and crafts council took place. The Knitbitch had a small Amigurumi exhibition in the Drabant Room sharing the space with Irene Birk from PaaPinden. It was as if we were a small break-out group, banished to a remote room, but fortunately with a lot of space. We showed a new perspective on craft, we demonstrated that even though craft is heavily grounded in traditions it can be modernized if you have imagination. And it can be a just as satisfying hobby for young as it is for elderly. well it isn't exactly that we are young, probably more something like middle aged, but together the two of us for sure brought down the average age of the show. We had both Jydske Vestkysten and DR nyhederne (17m30s) passing by to report, so couldn't complain about the media coverage. Edith Hansen, chairwoman of  Sønderborg arts and craft council spotted a trend, in the last years she has seen more young people participate. Whilst Irene Birk rightly observed that craft can compensate for some of the long hours that knowledge workers spend behind computers. I, myself have quite a demanding job that involves lots of computing and meetings, so for me there is no better way to unwind. I consider knitting and crocheting as meditation, and already quite a lot of research has been published to show that it's true.
Amigurumi line-up med Findus det forkølede vejarbejder pindsvin i forgrunden

mig og mine babies


Megapouf

Queensday ring


Ved siden af udstillingen holdt jeg også mini-workshop hvor man kunne lære at hækle amigurumi, det var rigtig hyggeligt, med nogle utroligt begrejstrede, koncentrerede og hårdtarbejdende deltagere. Her er der lige et par billeder
Lørdags skrappe expert-team og test-hold: Edith (forkvinden) Margit og Irene


Søndagsholdet: Irene (den hårdtarbejdende, der bare skal nå det hele, Anette (den absolut mest begrejstrede), Charlotte (den mest enthusiastiske) og en ældre dame som var meget ihærdigt og hæklede meget smukt. Og tjek lige ridderne i baggrunden som vågede over os.


Og lige et stemningsbillede her taget af Irene fra Paapinden


Opskriften på amigurumi er jeg stadig skyldig, den følger når jeg har lidt mere tid, fx i weekenden. Vi fandt jo alligevel et par fejl og de skal lige rettes før jeg putter den på nettet

Saturday, 5 October 2013

Amigurumi hækleworkshop i Sønderborg

I forbindelse med husflidsudstillingen på Sønderborg slot den 19-20 Oktober vil Hanne Caspersen aka The Knitbitch holde en amigurumi hækleworkshop, søndag 20 Oktober 12-16 i Drabantsalen.  Amigurumi er Japansk for lille udstoppet dyr eller anthropomorphic væsen. Ordet er en kombination af ami som betyder hækle eller strikke og huigurumi so betyder udstoppet. I denne workshop skal vi hækle en kanin.


I workshoppen vil du have brug for hæklegarn, fx bomulds eller acryl garn (ikke uld, det er for blødt), du kan bruge nogle rester eller små nøgler, der er op til dig selv om du vil arbejde med en eller flere farver. Tag også nogle rester brodergarn, hæklepinde (4 og 1,5mm) knapper(til øjne) eller rigtige bamseøjne, fyldemateriale, stoppenåle, sikkerhedslåse eller noget andet til at markere omgange og knappenåle med. Når man hækler amigurumi hækler man meget stramt, så du dine hæklenåle skal nok være et halvt eller helt nummer mindre end du er vant til.

Du skal kende basis teknikkerne for at kunne være med i hækleworkshoppen. Der arbejdes mest med kædemasker og fastmasker, der er også et par enkle stangmasker. Vi hækler i cirkler/spiraler, og tager ind og ud. I workshoppen vil der være et hæklemønster, en tegning på rigtig Japansk vis. Der vil også være nogle donerede garn-rester som du evt kan bruge noget af. Workshoppen er gratis (der betales entre til Sønderborg slot for husflids udstillingen), men det værdsættes at du enten giver et financielt bidrag til at dække omkostninger eller en donation i form af garn-rester eller gamle hækle-, eller strikke-bøger eller blade. Til information, et print koster ca 2,5-3 kr for en A4. der vil også være noget fylde-materiale.

Tid og sted: Søndag 20 Oktober 12-16, Drabantsalen, Sønderborg Slot
Antallet af deltagere er begrænset til 12 personer, pga begrænset plads og for at kunne give passende opmærksomhed og hjælp. Ved ualmindelig stor interesse kan workshoppen evt også holdes lørdag eftermiddag.
tilmelding til hannepanne@theknitbitch.com

links:
http://www.husflid.dk/arrangementer-og-udstillinger/details/408-udstilling-pa-sonderborg-slot
http://www.flickr.com/people/knitbitch/
Twitter: @theknitbitch

update fra 11 Oct omkring deltagere; indtil videre har jeg hørt fra
søndag:
Kirsten Bonde Sørensen
hendes veninde
hendes datter
Kis Christensen
og en veninde
Charlotte Braes
annette Brammann

evt loerdag
Jens Buch kone Helle og datter Tilde 
saa der er stadig plads til flere!

Monday, 17 June 2013

Knitting-in-public in Sønderborg slot

This sunday i joined the knitting-in-public event organized by Margit Berthelsen at Sønderborg slot.


We discussed the Amigurumi workshop that we want to organize in October when there will be a big craftmanship exhibition in the castle.


Here I am with my mum, knitting inside the ancient walls and vaults of the castle. Because of the bad weather the event had to be moved inside.

More on the event in October later.
Location:Sønderborg

Saturday, 4 May 2013

Queensday ring galore

Just posting some after-party pictures here. Eventually the weather on queensday turned out great, so it was fab to sit outside and crochet-in-public. Sales didn't go very well; queensday is really about bargaining and having fun, but I definitely had lots of people zooming in on me crocheting. It was great fun to chat with these people. And I had a perfect spot right in the middle of the Plompetorengracht party.

Queensday rings. The lot

decided to make an alternative, more simple ring and bracelet based on the flag colors,
this turned out to be quite a popular model

Here is one that @Aniettweet made, following the instructions I gave in an earlier post


very positive and happy queensday ring carriers

Sunday, 28 April 2013

Crochet a Queensday ring

What’s more Dutch for Queensday than a king or queen crown? That’s why I decided to crochet a ring with a crown on-top. The ring itself is not too difficult, it’s placing the ring on-top without interruption the work that’s challenging. If you find that too difficult you can crochet the 2 as seperate pieces and sew them together afterwards.
Good luck!


What you need for this project:
some standard thin cotton SMC
crochet hook 2 and 3mm.
Choose your combination of yarn and needle so that your crochet will get really tight in order to make the crown stand-up.


Step 1: the ring
Use hook 3mm, chain 16-18-20, check the size of the ring around your finger. Switch to hook 2 and join the ring by sc into the first chain, make sure that the ring isn't turned.
sc into every chn. make 3 rounds.


Step 2: The Crown:
Here comes the tricky part. Take a look at the ring from the top and imagine the crown that you are going to " raise" on-top of the ring. This helps you understand that you will need to crochet in almost the opposite direction than the work of the ring is directed.
chain 1, now sc1 in a bump in the middle of the ring, this will be the left extremity of the imaginary circle/base of the crown, chn 1. You have now "crossed"  the width of the ring. sc2 in the chains that form the outer edge of the ring. chn 1, sc 1 in a bump int he middle of the ring, chn 1, sc 2 in the chains that form the opposite outer edge. This should form a neat circle of 10 loops.
sc into every chain and make 2 rounds.
Now the spikes. Check that you have 10 chains we will be making spikes in every 2nd chn, 5 spikes in total. sc in the 1st chain, chn 2, sc back into the first chain of the string, sc 1 back into the chain where you made the 1st sc. this forms the first spike. jump 1. sc into the next chain of the crown, chn 3, sc back into the 2nd and 1st chain of the string, sc back into the chain where you made the 2nd sc. jump 1. sc into the next chain of the crown, chn 4, sc back into the 3rd, 2nd and 1st chain of the string, sc back into the chain where you made the 3rd sc. jump 1. sc into the next chain of the crown, chn 3, sc back into the 2nd and 1st chain of the string, sc back into the chain where you made the 4th sc. jump 1. sc into the next chain of the crown, chn 2, sc back into the 1st chain of the string, sc back into the chain where you made the 5th sc. make 1 pull-stitch to close the loop, cut the thread and pull through.


step 3: finish and decorate
work away the 2 loose ends with a needle. Embroider sequins and beads to decorate.

Good luck! and please message me, if you make any yourself, would love to see it!


More news and variations on crochet Queensday rings tomorrow, so stay tuned!

Saturday, 27 April 2013

Swapping crochet queensday rings


Today I met with Marina from by-wire.net. She was interested in some queensday rings. She choose 1 white ring, 2 orange, and a bleu, white, red striped and a bracelet. One of the orange rings and the bracelet she's going to give away to friends. We made a swap deal; in return i get 4 days worth of using time with the laser-cutter or 3d-printer in her studio. Plus perhaps some yarn from her stash and a beer if she can find me on queens-evening. I thought this was a very generous deal. She even wrote a slip of paper to seal the deal. 


I have made another swap with my colleague Julian who's setting up the FabLab in Tilburg (to open in September), he exchanged for a lovely 3D printed ring!


My colleague swapped for some jewellery, actually meant to be embroidered to decorate the rings. But they are way to pretty for that.


and my colleague Kathelijn donated her yarn in exchange for 2 rings.

Sunday, 21 April 2013

Crochet Queensday Ring

I'm ready for queensday! If the weather allows I will have a little booth where I will be selling these crochet queensday rings. Planning to publish the pattern next weekend, so stay tuned if you also want to crochet queensday rings.